Installing LabKey on CentOS 7
Introduction
Installing LabKey for your lab can be done a number of ways. This approach manually installs virtually all aspects of the LabKey software stack, allowing for easy long term maintenance and the upgrades.
Section 1: Setting up CentOS 7
Let’s begin with installing RHEL or CentOS 7 on your hardware or VM. For these instructions and their illustrative purpose, the CentOS 7 Minimal ISO was selected and installed in a VM with 8GB memory, 2 cores, and a 64GB drive. Please see here for Labkey’s recommened hardware requirements
After the install’s reboot, let’s disable the NetworkManager service, and then setup a static IP via the networking scripts:
[root@localhost]# systemctl disable NetworkManager
Removed symlink /etc/systemd/system/multi-user.target.wants/NetworkManager.service.
Removed symlink /etc/systemd/system/dbus-org.freedesktop.NetworkManager.service.
Removed symlink /etc/systemd/system/dbus-org.freedesktop.nm-dispatcher.service.
Configure the script with the appropriate values for your environment, making sure that the script is set to “ON”.
[root@localhost]# vi /etc/sysconfig/network-scripts/ifcfg-eth
TYPE=Ethernet
NAME=eth0
IPADDR=10.17.0.101
NETMASK=255.255.255.0
GATEWAY=10.17.0.1
DNS1=8.8.8.8
DNS2=8.8.4.4
NM_CONTROLLED=no
BOOTPROTO=static
ONBOOT=yes
USERCTL=no
DEFROUT=yes
PEERDNS=yes
PEERROUTES=yes
IPV4_FAILURE_FATAL=no
IPV6INIT=no
IPV6_AUTOCONF=no
IPV6_PEERDNS=no
IPV6_PEERROUTES=no
IPV6_FAILURE_FATAL=no
UUID=(unique ID already present)
[root@localhost]# systemctl restart network
We now have a static IP for our web server on the local network. We’ll now set up a hostname if not yet set at installation.
[root@localhost]# hostnamectl set-hostname lims-1
[root@lims_1 ~]# hostname
lims-1
[root@lims_1 ~]#
If you haven’t yet, let’s update the system and reboot.
[root@lims_1 ~]# yum -y update; reboot
Section 2: Preparing for LabKey’s Installation Prerequisites
We will now need to download the Server Java JRE from Oracle, and the LabKey software form LabKey, Postgres, and the Tomcat software from the Apache project. Move to the src directory to download the needed software with wget, and then unpack the software.
Note: On the list of Java JRE, be sure to select the “Server JRE” in order to better secure your machine. Performance will also be better.
[root@lims_1 ~]# yum install wget gcc
[root@lims_1 ~]# cd /usr/local/src
After you are done, it should look similar to this, but with newer version numbers:
[root@lims-1 src]# ll -h
total 242M
drwxr-xr-x. 9 root root 4.0K Aug  6 17:11 apache-tomcat-8.5.4
-rw-r--r--. 1 root root 8.9M Jul  6 02:26 apache-tomcat-8.5.4.tar.gz
drwxr-xr-x. 8   10  143 4.0K Jun 22 03:09 jdk1.8.0_101
drwxr-xr-x. 6 root root 4.0K Aug  6 17:11 LabKey16.2-45209.14-community-bin
-rw-r--r--. 1 root root 153M Jul 15 17:22 LabKey16.2-45209.14-community-bin.tar.gz
drwxrwxrwx. 6 1107 1107 4.0K May  9 14:08 postgresql-9.5.3
-rw-r--r--. 1 root root  24M May  9 14:08 postgresql-9.5.3.tar.gz
-rw-r--r--. 1 root root  58M Aug  6 17:16 server-jre-8u101-linux-x64.tar.gz
When creating your folders as I did below, name each one with the appropriate version number. LabKey updates frequently, so we’ll be creating generic name soft links for each component, and can simply change the directory to the new version as we upgrade all of this later in the year and beyond.
[root@lims_1 ~]# cd /usr/local
[root@lims_1 local]# mkdir labkey-16.2
[root@lims-1 local]# mkdir jre-8u101
[root@lims-1 local]# mkdir tomcat-8.5.4
[root@lims-1 local]# mkdir postgres-9.5.3
[root@lims-1 local]# ln -s labkey-16.2 labkey
[root@lims-1 local]# ln -s postgres-9.5.3 pgsql
[root@lims-1 local]# ln -s jre-8u101 java
[root@lims-1 local]# ln -s tomcat-8.5.4 tomcat
You should see something like this now:
[root@lims-1 local]# ll
total 4
drwxr-xr-x. 2 root root   6    Aug 12  2015 bin
drwxr-xr-x. 2 root root   6    Aug 12  2015 etc
drwxr-xr-x. 2 root root   6    Aug 12  2015 games
drwxr-xr-x. 2 root root   6    Aug 12  2015 include
lrwxrwxrwx. 1 root root   9    Aug  6 17:21 java -> jre-8u101
drwxr-xr-x. 2 root root   6    Aug  6 16:57 jre-8u101
lrwxrwxrwx. 1 root root   11   Aug  6 17:20 labkey -> labkey-16.2
drwxr-xr-x. 2 root root   6    Aug  6 16:43 labkey-16.2
drwxr-xr-x. 2 root root   6    Aug 12  2015 lib
drwxr-xr-x. 2 root root   6    Aug 12  2015 lib64
drwxr-xr-x. 2 root root   6    Aug 12  2015 libexec
lrwxrwxrwx. 1 root root   14   Aug  6 17:20 pgsql -> postgres-9.5.3
drwxr-xr-x. 2 root root   6    Aug  6 17:17 postgres-9.5.3
drwxr-xr-x. 2 root root   6    Aug 12  2015 sbin
drwxr-xr-x. 5 root root   46   Aug  5 22:04 share
drwxr-xr-x. 6 root root 4096   Aug  6 17:17 src
lrwxrwxrwx. 1 root root   12   Aug  6 17:21 tomcat -> tomcat-8.5.4
drwxr-xr-x. 2 root root   6    Aug  6 16:55 tomcat-8.5.4
Installing the JRE is easy, as it is simply a move into our /usr/local/java folder:
[root@lims_1 local]# cd /usr/local/src
[root@lims-1 src]# mv jdk1.8.0_101/* ../java/
Next, we’ll install and turn on apache, to confirm it is working.
[root@lims-1 local]# yum install httpd
[root@lims-1 local]# systemctl start httpd
Verify it is working by loading it up your browser, using the IP (or DNS if you set it up). In this instance, typing in http://10.17.0.101 worked for me. Since it’s working, let’s make httpd startup permanent:
[root@lims-1 local]# systemctl enable httpd
Note: If you have any issues accessing the success page for Apache, check the firewall to make sure it has the port open.
Section 3: Installing Tomcat 8
Now that Apache is running, we will now install and verify Tomcat is working. First, let’s set our Java environment so we are using the right Java for our project, regardless of whether the CentOS java default installation ever occurs.
First, open a new file…
[root@lims-1 local]# vi > /etc/profile.d/java_env.sh
Then enter the following before saving and closing..
export JAVA_HOME=/usr/local/java
export PATH=$JAVA_HOME/bin:$PATH
Now add this to your current environment and verify:
[root@lims-1 local]# source /etc/profile.d/java_env.sh
[root@lims-1 local]# java -version
java version "1.8.0_101"
Java(TM) SE Runtime Environment (build 1.8.0_101-b13)
Java HotSpot(TM) 64-Bit Server VM (build 25.101-b13, mixed mode)
We’ll now move files, create our tomcat user, and set the permissions for directory:
[root@lims-1 local]# cp -R apache-tomcat-8.5.4/* /usr/local/tomcat-8.5.4/
[root@lims-1 local]# cd /usr/local/tomcat
[root@lims-1 tomcat]# groupadd tomcat
[root@lims-1 tomcat]# useradd -s /bin/nologin -g tomcat -d /usr/local/tomcat tomcat
useradd: warning: the home directory already exists.
Not copying any file from skel directory into it.
[root@lims-1 tomcat]# chown -R tomcat.tomcat /usr/local/tomcat-8.5.4
[root@lims-1 tomcat]# chmod g+rwx conf
[root@lims-1 tomcat]# chmod g+r conf/*
Now that we have the tomcat files and user in place, let’s have them run the service and have it start automatically on reboot:
[root@lims-1 tomcat]# vi /etc/systemd/system/tomcat.service
In this new tomcat.service file, enter the following, slightly tuned for LabKey:
# Systemd unit file for tomcat

[Unit]
Description=Apache Tomcat Web Application Container
After=network.target

[Service]
Type=forking
PIDFile=/usr/local/tomcat/temp/tomcat.pid
Environment=JAVA_HOME=/usr/local/java
Environment=CATALINA_PID=/usr/local/tomcat/temp/tomcat.pid
Environment=CATALINA_HOME=/usr/local/tomcat
Environment=CATALINA_BASE=/usr/local/tomcat
Environment='CATALINA_OPTS=-Xms512M -Xmx2048M -server -XX:-HeapDumpOnOutOfMemoryError'
Environment='JAVA_OPTS=-Djava.awt.headless=true -Djava.security.egd=file:/dev/./urandom'

ExecStart=/usr/local/tomcat/bin/startup.sh
ExecStop=/usr/local/tomcat/bin/shutdown.sh

User=tomcat
Group=tomcat

[Install]
WantedBy=multi-user.target
Save and quit, then integrate it with the system:
[root@lims-1 tomcat]# systemctl daemon-reload
[root@lims-1 tomcat]# systemctl start tomcat
Check in a browser that this works correctly. For these instructions, we’ll load http://10.17.0.101:8080 in our browser. Note: If you checked before this step by starting it manually, you might now have log files owned by root in the tomcat directory that won’t be written to. These should be fixed before continuing.
Section 4: Installing PostgreSQL
First install the openssl development files and a couple other things so we can build PostgreSQL, and with SSL support:
[root@lims-1 tomcat]# yum install openssl*64 bison* readline*
Move to the src directory, make a build directory, and run configure from within the config directory:
[root@lims-1 tomcat]# cd ../src/postgresql-9.5.3
[root@lims-1 postgresql-9.5.3]# ./configure --with-openssl --prefix=/usr/local/pgsql
[root@lims-1 postgresql-9.5.3]# make
You should see a “All of PostgreSQL successfully made. Ready to install.” at the end of the build. If so, proceed with:
[root@lims-1 postgresql-9.5.3]# make install
Let’s make the user and group to run the service with, as we don’t want to run this as root:
[root@lims-1 postgresql-9.5.3]# cd /usr/local/pgsql
[root@lims-1 pgsql]# groupadd postgres
[root@lims-1 pgsql]# adduser postgres -g postgres -d /usr/local/pgsql
adduser: warning: the home directory already exists.
Not copying any file from skel directory into it.
[root@lims-1 pgsql]# passwd postgres (let's go with: d8@b@53b@by)
[root@lims-1 pgsql]# chown -R postgres /usr/local/postgres-9.5.3
Now switch to the postgres user, and initialize the database cluster. There will be a bunch of output that I won’t copy below, but you should see a “Success” near the end of the output after initialization.
[root@lims-1 pgsql]# su postgres
bash-4.2$ bin/initdb -D /usr/local/pgsql/data
bash-4.2$ exit
[root@lims-1 pgsql]# mkdir -p /var/log/pgsql
[root@lims-1 pgsql]# chown -R postgres:postgres /var/log/pgsql/
[root@lims-1 pgsql]# vi data/postgresql.conf
In the postgresql.conf file, uncomment and change the following in order to use our logging directory:
logging_collector = on
log_directory = '/var/log/pgsql/'
Setup psql to accessible in your path permanently:
[root@lims-1 pgsql]# vi /etc/profile.d/postgresql.sh
And enter one line:
export PATH=/usr/local/pgsql/bin:$PATH
Save and source:
[root@lims-1 pgsql]# source /etc/profile.d/postgresql.sh
Now we’ll create the startup script for systemd, much like we did for tomcat. To start, create the file:
[root@lims-1 pgsql]# vi /etc/systemd/system/postgres.service
And then enter the following:
# Systemd unit file for PostgreSQL

[Unit]
Description=PostgreSQL database server
After=network.target

[Service]
Type=forking

User=postgres
Group=postgres

# Where to send early-startup messages from the server (before the logging
# options of postgresql.conf take effect)
# This is normally controlled by the global default set by systemd
# StandardOutput=syslog

# Disable OOM kill on the postmaster
OOMScoreAdjust=-1000
# ... but allow it still to be effective for child processes
# (note that these settings are ignored by Postgres releases before 9.5)
Environment=PG_OOM_ADJUST_FILE=/proc/self/oom_score_adj
Environment=PG_OOM_ADJUST_VALUE=0

# Maximum number of seconds pg_ctl will wait for postgres to start.  Note that
# PGSTARTTIMEOUT should be less than TimeoutSec value.
Environment=PGSTARTTIMEOUT=270
Environment=PGDATA=/usr/local/pgsql/data

ExecStart=/usr/local/pgsql/bin/pg_ctl start -D ${PGDATA} -s -w -t ${PGSTARTTIMEOUT}
ExecStop=/usr/local/pgsql/bin/pg_ctl stop -D ${PGDATA} -s -m fast
ExecReload=/usr/local/pgsql/bin/pg_ctl reload -D ${PGDATA} -s

# Give a reasonable amount of time for the server to start up/shut down.
# Ideally, the timeout for starting PostgreSQL server should be handled more
# nicely by pg_ctl in ExecStart, so keep its timeout smaller than this value.
TimeoutSec=300

[Install]
WantedBy=multi-user.target
And now make integrate into systemd, make it persistent between reboots, and start it up:
[root@lims-1 pgsql]# systemctl daemon-reload
[root@lims-1 pgsql]# systemctl enable postgres
[root@lims-1 pgsql]# systemctl start postgres
We can now log into postgres and set our password for the superuser:
[root@lims-1 pgsql]# su postgres
bash-4.2$ psql
psql (9.5.3)
Type "help" for help.

postgres=# alter user "postgres" with password 'l@bk3yR!ng';
postgres=# \q
[root@lims-1 pgsql]#
Setup better security for the system, let’s require that password for postgres in /usr/local/pgsql/data/pg_hba.conf:
[root@lims-1 pgsql]# vi data/pg_hba.conf
And then near the bottom, make it match this (changes in bold):
# "local" is for Unix domain socket connections only
local   all         postgres                           md5
# IPv4 local connections:
host all            all            127.0.0.1/32        md5
# IPv6 local connections:
host all            all            ::1/128             md5
# Allow replication connections from localhost, by a user with the
# replication privilege.
#local   replication    postgres                           trust
#host    replication    postgres       127.0.0.1/32        trust
Save the file, exit, and now restart postgres to integrate the changes:
[root@lims-1 pgsql]# systemctl restart postgres
Now our prerequisites are installed and ready for LabKey.
Section 5: Installing LabKey
To begin, let’s move to the src folder we have for labkey:
[root@lims-1 pgsql]# cd /usr/local/src/LabKey16.2-45209.14-community-bin
Copy the tomcat JAR files to our /usr/local/tomcat/lib directory:
[root@lims-1 LabKey16.2-45209.14-community-bin]# cp tomcat-lib/* /usr/local/tomcat/lib/
Then copy the following three directories to the /usr/local/labkey directory:
[root@lims-1 LabKey16.2-45209.14-community-bin]# cp -R labkeywebapp /usr/local/labkey/

[root@lims-1 LabKey16.2-45209.14-community-bin]# cp -R modules /usr/local/labkey/

[root@lims-1 LabKey16.2-45209.14-community-bin]# cp -R pipeline-lib /usr/local/labkey/
The user who is executing the Tomcat process must have write permissions for the /labkeywebapp and /modules directories. Set the owner and group on the labkey directory to tomcat:tomcat:
[root@lims-1 LabKey16.2-45209.14-community-bin]# chown -R tomcat.tomcat /usr/local/labkey-16.2
Note: This Labkey/CentOS document does not include a bin/ files component nor SSL setup. You can click here for more information on the LabKey website, or skip for now and continue…
Move the labkey.xml file to the tomcat service:
[root@lims-1 LabKey16.2-45209.14-community-bin]# cp labkey.xml /usr/local/tomcat/conf/Catalina/localhost/ROOT.xml
Now edit the /usr/local/tomcat/conf/Catalina/localhost/labkey.xml file, replacing the following:
- Replace @@appDocBase@@ with /usr/local/labkey/labkeywebapp
- Replace @@jdbcUser@@ & @@jdbcPassword@@ with administrator credentials for the database, for this example, postgres and l@bk3yR!ng
- Replace @@masterEncryptionKey@@ with your own randomly generated 32 ascii character password, or 64 bit hex characters.
- Change the url line from url=”jdbc:postgresql://localhost:8080/labkey” to url=”jdbc:postgresql://localhost:5432/labkey”.
To now make tomcat load our xml file and labkey, restart the service:
[root@lims-1 LabKey16.2-45209.14-community-bin]# systemctl restart tomcat
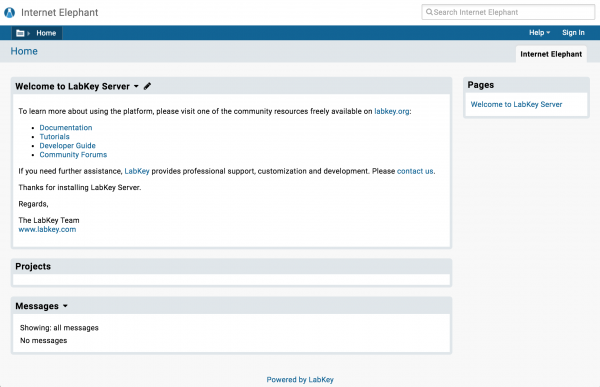
You can now try loading LabKey in your browser, in this example, typing in http://10.17.0.101:8080 (or if you didn’t rename labkey.xml to ROOT.xml above, http://10.17.0.101:8080/labkey
A wizard should appear (in the browser), and they will help you with the rest.
Appendix
Related links/sources: